
Sauces & Condiments
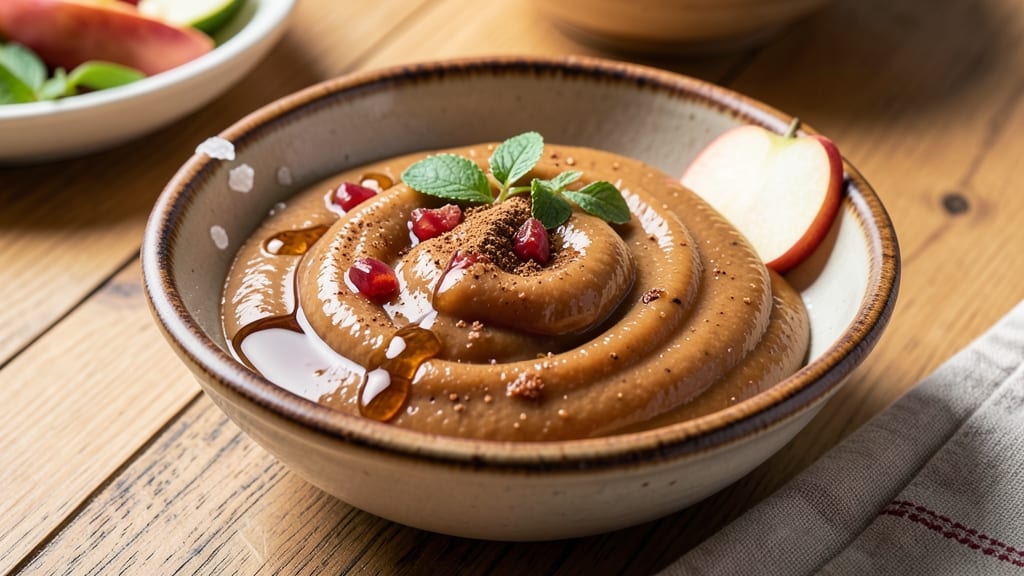
This apple sauce recipe with maple syrup transforms simple apples into a velvety, spiced condiment that elevates everything from roasted pork to morning pancakes. 💛 Growing up in Nana Mae's diner, I learned how a few key ingredients—apples, maple syrup, and a pinch of cinnamon—could turn an ordinary dish into something extraordinary.
The secret lies in balancing sweetness and warmth, creating a sauce that's versatile enough for both savory and sweet applications.
The process is simpler than you might think: simmer peeled and chopped apples with maple syrup until tender, then mash or blend to your preferred texture.
I prefer a slightly chunky consistency that still coats the back of a spoon beautifully, but you can adjust it to be completely smooth if desired. The maple syrup adds depth that store-bought versions can't match, while cinnamon and a touch of lemon brighten the flavor profile.
What you'll end up with is a sauce that's perfect for drizzling over roasted meats, mixing into oatmeal, or spooning alongside fresh bread. The natural sweetness of the apples pairs beautifully with the rich caramel notes of maple syrup, creating a condiment that's both comforting and sophisticated.
This recipe delivers restaurant-quality results with minimal effort—just 30 minutes of active time and a few simple ingredients.
Once you've mastered this basic version, you can easily customize it with additional spices like nutmeg or cardamom, or even incorporate diced apples for texture. The sauce keeps well in the refrigerator for up to a week, making it an excellent make-ahead option for busy mornings or holiday meals.
Let's get started on creating your perfect batch of apple sauce with maple syrup.
Ingredients for apple sauce recipe with maple syrup
Eight simple ingredients transform humble apples into velvety, spiced apple sauce with maple syrup's rich caramel notes.
| Ingredient | Amount | Notes |
|---|---|---|
| Apples 🍎 | 4 medium | Peeled, cored, chopped |
| Pure Maple Syrup 🍯 | ½ cup | Grade A for best flavor |
| Water 💧 | ¼ cup | For simmering apples |
| Ground Cinnamon 🌿 | 1 tsp | Freshly ground preferred |
| Lemon Juice 🍋 | 1 tbsp | Freshly squeezed |
| Salt 🧂 | ¼ tsp | Fine sea salt |
| Vanilla Extract 🌸 | ½ tsp | Optional for depth |
| Brown Sugar 🍚 | 1 tbsp | Lightly packed |
Apples are the heart of this sauce—Granny Smith for tartness or Honeycrisp for sweetness. Local farmers markets often have the freshest, crispest varieties, but grocery store apples work too if they're firm and unbruised. I usually buy a mix of both for balance. The maple syrup? Grade A dark amber adds the deepest flavor—skip the pancake syrup. If you're feeling fancy, grab a small bottle of Vermont maple syrup from the specialty section at Whole Foods or Trader Joe's.
No maple syrup? Substitute with apple cider or extra apples, but you'll lose that caramel depth. Fresh lemon juice hard to find? Bottled works in a pinch, though it's less bright. Want to skip the vanilla? Add a pinch of nutmeg instead—it pairs beautifully with cinnamon. The brown sugar is optional but helps balance tart apples. If you're using very sweet apples, you can cut it to half a tablespoon. For a smoother texture, simmer the apples longer before mashing.
This sauce keeps beautifully—1 week in the fridge or 6 months in the freezer. I like to portion it into small jars so I can grab one for quick use. The flavor actually improves after a day or two as everything melds together. If you're making this ahead for a big meal, freeze half now and save the other half for later. Trust me, you'll want leftovers.
Why You'll Love This Recipe
- No-Peel Hassle: I’ll admit—peeling apples used to make me skip this. But tossing them in whole (just cored and chopped) with a splash of water? The skins soften into that velvety texture, and honestly, no one notices. Now I’m saving 10 minutes every time.
- Sweet Heat Balance: That first spoonful of warm apples kissed with maple syrup and cinnamon? It’s like autumn in a jar. The lemon juice cuts through the richness just enough to keep it bright—no cloying sweetness here. (Yes, even on a Tuesday night.)
- Pantry Staple Magic: You’re staring at your fridge, wondering what to eat, and suddenly—bam—this sauce is ready. Spread it on toast, stir it into oatmeal, or drizzle it over yogurt. I’ve even used it to glaze roasted chicken. Three ingredients you already own, one new flavor adventure.
- Fridge-Friendly Treasure: Make a big batch—it keeps for weeks in the fridge. Freeze half for when you’re too tired to cook. The cinnamon deepens over time, and the maple syrup never crystallizes. My go-to when I’m lazy or hosting unexpected guests. (Spoiler: They’ll never know it’s the same sauce.)
Step-by-step instructions for homemade maple-apple sauce
Here's how to make this cozy, spiced apple sauce that's perfect for roasts and desserts.
🍳 Step 1: Simmer Apples Until Tender
In a medium saucepan, combine the 4 medium chopped apples, 0.25 cup water, 1 tbsp brown sugar, 0.25 tsp salt, and 1 tsp ground cinnamon. Stir just to combine—you want the spices to coat the fruit evenly. Bring to a gentle boil over medium-high heat, then immediately reduce to medium-low heat. Let the apples simmer uncovered for 15-20 minutes, stirring occasionally, until they break down completely and the mixture becomes thick and jammy.
Here's the thing—you'll know it's done when the apples are completely soft and the sauce starts to thicken naturally. If you see the mixture getting too dry before the apples are tender, add 1-2 tablespoons of water at a time. The sauce should coat the back of a spoon when you stir it.
🍳 Step 2: Sweeten and Balance Flavors
Once the apples are perfectly tender, stir in the 0.5 cup pure maple syrup and 1 tbsp lemon juice. The maple syrup will deepen the flavor while the lemon juice brightens everything up. Let the mixture simmer for another 5 minutes to let those flavors meld together. You'll notice the sauce becoming glossy and slightly thicker as it cooks down.
Taste the sauce at this point—it should be sweet but not cloying, with warm cinnamon notes. If it needs more brightness, add a splash more lemon juice. If it needs more sweetness, add a bit more maple syrup. This is where you fine-tune the flavor to your preference.
👨🍳 Step 3: Finish with Vanilla and Texture Check
Remove the saucepan from heat and stir in the 0.5 tsp vanilla extract. Let it sit for 2-3 minutes to allow the vanilla to infuse completely. The vanilla adds a subtle depth that makes this sauce truly special. While it's still warm, use a potato masher or fork to achieve your desired texture—smooth and silky or slightly chunky with apple pieces.
For a smoother sauce, press through a fine-mesh sieve. For a rustic texture, leave it slightly chunky. This is where you decide how you want your apple sauce to look and feel. Either way, it's ready to serve immediately or store for later use.
⏰ Step 4: Rest and Serve Warm
Transfer the apple sauce to a serving bowl and let it rest for 5-10 minutes. This resting time allows the flavors to settle and the sauce to thicken slightly, making it even more delicious. Serve it warm alongside roasted meats, as a topping for pancakes, or even as a filling for pies and tarts.
Real talk: This sauce tastes even better the next day when the flavors have had time to develop. If you're not using it all immediately, store it in an airtight container in the refrigerator for up to 5 days. Reheat gently on the stove or in the microwave, stirring occasionally to maintain that perfect texture.
Pro Tips For Making Apple Sauce Recipe With Maple Syrup
- Peel and Core Like a Pro: Don’t just slice apples—peel and core them first, then chop into even ½-inch pieces. Uneven chunks burn on the edges while the center stays raw, and you’ll end up with a mushy, inconsistent sauce.
- Use a Splash of Water: Add ¼ cup water to the pot before the apples hit the heat. This prevents scorching and helps the maple syrup caramelize evenly—no burnt bits, just smooth, glossy sauce.
- Skip the Boil, Simmer Instead: High heat turns apple sauce into glue. Once the apples soften (about 10 minutes), drop the heat to a gentle simmer and let it cook uncovered. You’ll save time and avoid a sticky mess.
- Finish with Lemon Zest, Not Just Juice: After cooking, stir in a teaspoon of fresh lemon zest along with the juice. The zest brightens the flavor and balances the sweetness—trust me, it’s the difference between good and really good.
Essential equipment for perfect results
Saucepan Essentials
Start with a medium-sized stainless steel saucepan—I recommend a 3-quart with sloped sides to prevent spills. The stainless steel conducts heat evenly, preventing hot spots that can burn your apples. My go-to is a All-Clad Stainless Steel Saucepan from Central Market, but any quality brand works.
Avoid non-stick pans for this recipe—they don't handle high heat well, and you want that natural caramelization from the apples. 🔥
For the best results, use a saucepan with a helpful pouring spout—it makes transferring the finished sauce to jars so much easier. I keep my All-Clad pan on the stove all the time because it's so versatile.
If you're on a budget, a Cuisinart MultiClad Pro is a great alternative that gives professional results without the high price tag.
Heat Control Tools
A kitchen thermometer is my secret weapon for perfect apple sauce. I use a Thermoworks Thermapen ONE to monitor the simmering temperature—ideal range is 180-190°F. This prevents scorching while ensuring the apples cook evenly.
The thermometer also helps you know exactly when the sauce has reached that perfect jammy consistency. It's an investment, but it changes how I cook everything.
For heat adjustment, I recommend a silicon pot holder—they're heat-resistant and won't melt like some cheap gloves. I also keep a small whisk nearby to stir the sauce gently without scraping the bottom. The whisk helps distribute the spices evenly throughout the apples as they cook.
Texture Adjusters
For smooth apple sauce, a fine-mesh sieve or food mill is essential. I prefer the OXO Good Grips Food Mill because it's easy to clean and gives consistent results. If you're going for a chunky texture, a potato masher or fork works perfectly.
The key is to mash while the sauce is still warm—this makes it much easier to achieve your desired consistency. 💛
For storage, I use glass mason jars with airtight lids. The jars are microwave-safe and perfect for portion control. I like the Ball Mason Jars from Austin farmers markets—they're durable and come in various sizes.
If you're freezing the sauce, leave about 1 inch of headspace to prevent cracking when it expands.
Optional Extras
If you want to add diced apples for texture, a sharp chef's knife and cutting board are must-haves. I use a Wüsthof Classic knife for precision cutting.
For extra flavor depth, consider a mortar and pestle to grind your own cinnamon and spices fresh—it makes a noticeable difference in the final product.
Finally, a small ladle comes in handy for serving. I like to keep one in my saucepan at all times so I can taste-test as I go. The ladle also makes it easy to transfer small portions of sauce for testing flavors without wasting much.
Trust me, you'll be tasting this sauce more than once!
Nutrition facts
Frequently asked questions
Can I use any type of apple for this recipe?
You can use most apples, but tart varieties like Granny Smith or Braeburn work best—they hold up well during cooking and add brightness. For a sweeter sauce, try Honeycrisp or Gala. Avoid overly soft apples like Red Delicious, as they can turn mushy. Mixing tart and sweet apples creates the perfect balance of flavors.
How do I adjust the sweetness if my apples are very tart?
Start by adding an extra 1-2 tablespoons of maple syrup during the final 5-minute simmer. You can also reduce the brown sugar to half a tablespoon if your apples are naturally sweet. Taste as you go—remember, flavors meld better when the sauce cools slightly. For extra depth, add a pinch of vanilla bean paste instead of extract.
Can I make this apple sauce without a stove?
Yes! Use an Instant Pot or slow cooker for hands-off cooking. For the Instant Pot, combine all ingredients (except vanilla) and cook on high pressure for 5 minutes, then quick-release. In a slow cooker, simmer on low for 3-4 hours until apples are tender. Add vanilla at the end. Both methods work well, but watch the texture—slow cookers may need a splash of water if it gets too thick.
What's the best way to store leftover apple sauce?
Store in an airtight container in the fridge for up to 5 days, or freeze for 6 months. For freezing, leave 1-inch headspace in jars to prevent cracking. Reheat gently on the stove or microwave, stirring occasionally. The flavor actually improves after 24 hours as the spices infuse deeper—perfect for making ahead for holiday meals!
Can I use this sauce for savory dishes?
The maple syrup and cinnamon add wonderful depth to roasted pork tenderloin or ham. For a glaze, simmer the sauce until thickened and brush over meats in the last 10 minutes of cooking. You can also mix it into stuffing or serve it with grilled cheese sandwiches for a sweet-savory twist. The key is balancing the sweetness with complementary flavors like thyme or sage.