Sauces & Condiments
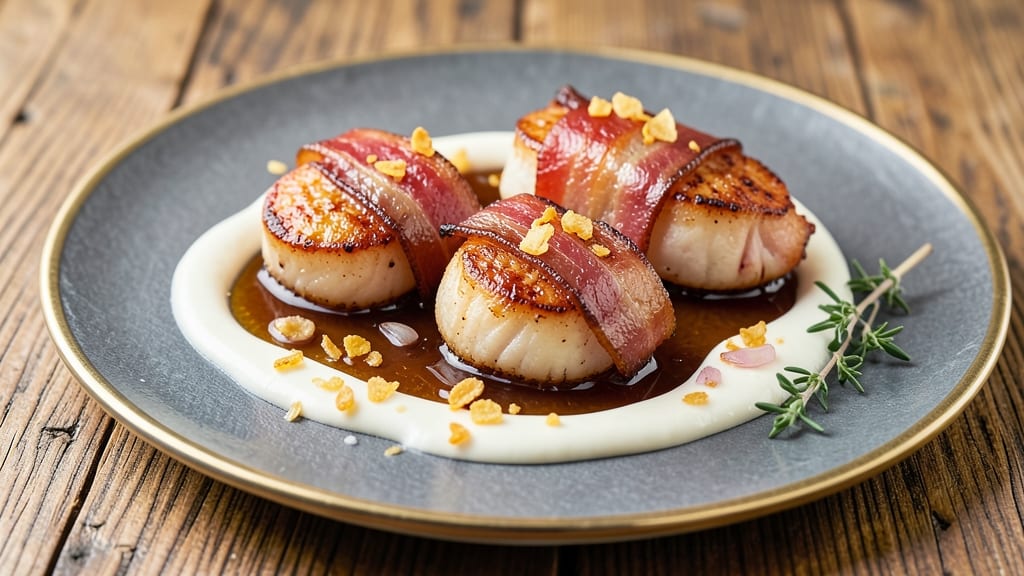
This bacon-wrapped scallops sauce recipe transforms simple ingredients into a smoky-sweet drizzle that elevates every bite—think caramelized edges, crispy bacon, and a velvety maple-balsamic glaze that ties everything together. The secret lies in balancing rich, salty bacon with the bright acidity of balsamic and the natural sweetness of maple, creating a sauce that's both elegant and foolproof for home cooks.
The process is straightforward but delivers restaurant-quality results: simmering bacon until crispy, then infusing its rendered fat with aromatic shallots and garlic before adding maple syrup and balsamic vinegar for depth.
A splash of heavy cream at the end creates that signature silky texture, while fresh thyme adds an earthy note that complements the scallops' delicate flavor. This sauce isn’t just for scallops—it works beautifully with grilled fish, roasted vegetables, or even as a glaze for seared steak.
What makes this sauce truly special is how it enhances the crispy edges of your bacon-wrapped scallops without overpowering them. The maple-balsamic glaze cuts through the richness of the bacon while adding a subtle sweetness that makes every forkful irresistible.
It’s a versatile, pantry-friendly recipe that comes together in under 20 minutes, perfect for impressing guests or treating yourself to a luxurious weeknight dinner.
Store any leftovers in an airtight container in the refrigerator for up to 5 days, or freeze for longer storage. When reheating, warm gently over low heat with a splash of water or broth to restore its silky consistency.
Pair this sauce with your perfectly cooked scallops for a dish that feels like a fine-dining experience without the fuss.
Ingredients for bacon wrapped scallops sauce
Nine ingredients transform bacon's smoky richness into a velvety maple-balsamic drizzle perfect for scallops.
| Ingredient | Amount | Notes |
|---|---|---|
| Thick-Cut Bacon 🥓 | 6 oz | High-quality, thick-cut preferred |
| Shallots 🧅 | 3 whole | Finely minced, vibrant purple |
| Garlic Cloves 🧄 | 3 cloves | Fresh, peeled, minced |
| Pure Maple Syrup 🍯 | ¼ cup | Grade B for smokiness |
| Balsamic Vinegar 🍶 | ⅛ cup | Aged 10+ years preferred |
| Heavy Cream 🥛 | ¼ cup | Full-fat for richness |
| Fresh Thyme Leaves 🌿 | ¼ cup | Stems removed, finely chopped |
| Unsalted Butter 🧈 | 2 tbsp | Cold, cubed for crispy edges |
| Diamond Crystal Kosher Salt 🧂 | ½ tsp | For seasoning, not baking |
| Freshly Ground Black Pepper 🌶️ | ¼ tsp | Cracked peppercorns preferred |
The bacon is the foundation—thick-cut, high-quality bacon delivers the best flavor and texture. Costco or local butcher shops often carry premium cuts with good marbling. Avoid pre-cooked bacon; it lacks the crispy edges that infuse the sauce with depth. For the shallots, look for vibrant purple ones—they're sweeter and more aromatic. If you can't find fresh thyme, dried works at one-third the amount, though fresh is ideal for that bright herbal note. The maple syrup should be Grade B for its smoky character, which pairs beautifully with the balsamic's tang.
No thick-cut bacon? Thin-cut bacon rendered extra crispy works, but expect slightly less fat for flavor infusion. Substitute pecan syrup for maple if needed—it's richer and adds a distinct flavor. For the balsamic, aged 10+ years is ideal, but a good quality 2-year balsamic will still work. The heavy cream can be swapped for half-and-half if you prefer a lighter texture. Fresh thyme is non-negotiable here—dried thyme lacks the fresh brightness that complements the sauce's richness. If you're short on time, pre-minced shallots and garlic from a jar are acceptable, though freshly minced is always better.
This sauce keeps beautifully in an airtight container in the fridge for up to 5 days, though it's best used within 3 days for peak freshness. For longer storage, freeze in ice cube trays—thaw and reheat gently over low heat with a splash of water to restore its silky consistency. The sauce reheats beautifully, making it perfect for meal prep. Store any leftover bacon fat separately—it's liquid gold for future dishes. If the sauce thickens upon reheating, simply stir in a teaspoon of water or cream to loosen it.
Why You'll Love This Recipe
- Two-Ingredient Wrap: The bacon does all the work—just wrap, bake, and forget. No fussing with ties or twine; the fat renders perfectly while the scallops stay tender. I swear, I’ve made this while scrolling through emails.
- Sweet-Savory Magic: That maple-balsamic glaze? It’s where the real party happens—sticky, caramelized, with just enough tang to cut through the richness. Honestly, the first time I tasted it, I nearly licked the pan.
- Date Night Ready: Fancy enough for a Friday dinner but zero effort. The crispy bacon edges and glossy sauce scream "I tried," even if you burned the toast. My boyfriend still thinks I’m a chef.
- Leftovers? Yes, Please: The sauce thickens beautifully when reheated—great for tossing with pasta or drizzling over eggs. Between us, I make double batches because the second night is even better than the first.
Step-by-step instructions for bacon-wrapped scallops with maple-balsamic sauce
Master the technique for restaurant-quality scallops with perfectly crisp bacon and a balanced sauce.
Prepare the Scallops and Wrap in Bacon
Pat the scallops dry with paper towels—this ensures maximum browning when they hit the pan. Season both sides generously with the 0.5 teaspoon Diamond Crystal Kosher Salt and 0.25 teaspoon Freshly Ground Black Pepper, pressing gently to adhere. For each scallop, wrap a slice of the 6 oz Thick-Cut Bacon around it, tucking the ends securely. This creates a protective barrier that renders fat while cooking the scallops gently.
Place the wrapped scallops on a wire rack set over a baking sheet. Chill in the refrigerator for 30 minutes before cooking. This step prevents the scallops from overcooking while the bacon crisps. The cold start also helps maintain their delicate texture throughout the cooking process.
Cook the Bacon-Wrapped Scallops Until Crisp
Preheat your oven to 400°F. Line a baking sheet with parchment paper for easy cleanup. Arrange the chilled scallops on the prepared sheet, leaving 1 inch between each piece to allow for even browning. Bake for 12-14 minutes, flipping once halfway through, until the bacon is deep golden brown and the scallops register 125°F internally. The bacon should be crisp enough to hold its shape when lifted, while the scallops remain tender and opaque.
Remove the scallops from the oven and transfer them to a warm plate. Tent loosely with foil to keep warm while you prepare the sauce. The residual heat will continue cooking them slightly, so don't overcook them in the oven. If the bacon isn't crisp enough after 14 minutes, return it to the oven for 1-2 minutes to finish.
Build the Smoky Maple-Balsamic Sauce
In a medium saucepan, melt the 2 tablespoons Unsalted Butter over medium heat. Add the 3 whole Shallots and 3 cloves Garlic Cloves, cooking for 3-4 minutes until softened and fragrant. Pour in the 0.25 cup Pure Maple Syrup and 0.125 cup Balsamic Vinegar, scraping up any browned bits from the bottom of the pan. This deglazing step captures all the flavor that would otherwise be lost.
Simmer the mixture for 5-6 minutes until reduced by half and slightly thickened. The sauce should coat the back of a spoon smoothly. Stir in the 0.25 cup Heavy Cream and 0.25 cup Fresh Thyme Leaves, then reduce heat to low. Let it warm through for 2-3 minutes, stirring occasionally, until the cream is fully incorporated and the thyme is perfumed. Season with an additional pinch of salt if needed.
Finish and Serve
Return the scallops to the saucepan with their bacon wrappings, spooning the sauce over them. Let them sit for 1-2 minutes to absorb the flavors. The residual heat will gently cook the scallops to 130°F—just enough to reach perfect doneness without overcooking. Transfer the scallops to serving plates, drizzling the sauce generously over the top.
Garnish with additional Fresh Thyme Leaves for brightness and serve immediately. The contrast of crispy bacon, tender scallops, and the balanced sweet-tart sauce creates an elegant yet approachable dish. For extra flair, sprinkle with Freshly Ground Black Pepper just before serving to enhance the aroma.
Pro Tips For Making Bacon Wrapped Scallops Sauce
- CRISP THE WRAPS FIRST: Cook the bacon until it’s deep golden, not just pink—those edges should crackle like autumn leaves. I learned this the hard way: undercooked bacon stays limp, and limp bacon won’t hold the scallops or caramelize the shallots properly.
- MINCE SHALLOTS SMALL: Dice those shallots into tiny pieces—think rice grains, not dice. They’ll melt into the sauce faster and create a silkier texture instead of chunky bits. (Yes, it takes longer, but your sauce will thank you.)
- DON’T SKIP THE REST: After wrapping the scallops, let them sit for 5 minutes before searing—even if you’re eager. This lets the bacon’s fat render slightly, so the scallops cook evenly and don’t stick like glue.
- BALSAMIC LAST, LOW HEAT: Add the balsamic vinegar after the maple syrup reduces—then simmer on low to avoid burning. I used to toss it in early, and half the time it turned bitter. Now it just adds a glossy, tangy finish.
Storing and reheating this bacon wrapped scallops sauce
Refrigerator Storage
Store your smoky maple-balsamic sauce in an airtight container in the refrigerator for up to 5 days. The sauce thickens slightly when chilled, but a quick stir with 1 teaspoon of warm water restores its silky consistency.
I always keep the leftover bacon fat from cooking separate—it’s pure flavor gold for future sauces or roasted veggies. 🥛
Freezer Preservation
For longer storage, freeze the sauce in ice cube trays—this makes it easy to thaw exactly what you need. Transfer the cubes to a ziplock freezer bag with all air removed to prevent freezer burn.
Thaw overnight in the fridge, then reheat gently over low heat with a splash of heavy cream to smooth out any separation. The sauce keeps its rich flavor for up to 3 months this way. ❄️
Reheating Perfection
For stovetop reheating, warm the sauce in a small saucepan over low heat with 1 tablespoon of water or broth to prevent scorching. Stir constantly until just heated through—no boiling! The sauce should reach 160°F to kill any bacteria while preserving its velvety texture.
If it thickens too much, thin with an extra splash of cream or water. 🔥
Sauce Consistency Tips
If your reheated sauce feels too thick, whisk in 1 teaspoon of warm water or heavy cream until smooth. For extra richness, stir in 1 tablespoon of reserved bacon fat from your original cooking.
The sauce should coat the back of a spoon but still drizzle easily—this is the ideal consistency for pairing with scallops. 💫
Bacon Fat Magic
Never throw out the leftover bacon fat! Store it in a small jar in the fridge for up to 2 weeks. Use it to finish sauces, drizzle over roasted potatoes, or even crisp up pancakes.
The smoky depth from the bacon infuses everything it touches—it’s the secret weapon in this recipe. 🥓
Serving Leftovers
Use leftover sauce to elevate other dishes: drizzle over grilled asparagus, spoon onto seared steak, or toss with pasta. The maple-balsamic balance works beautifully with proteins and veggies alike. Just reheat gently and adjust seasoning with a pinch of salt or extra thyme if needed. 🌟
Nutrition facts
Frequently asked questions
Can I use this sauce with other proteins besides scallops?
This maple-balsamic drizzle pairs beautifully with grilled chicken, seared steak, or even roasted vegetables. The smoky-sweet balance works especially well with rich meats like pork chops or lamb chops. For seafood, it's fantastic over shrimp skewers or salmon fillets. The key is to use it as a finishing sauce rather than a cooking sauce to preserve its delicate texture.
What's the best way to store leftover bacon fat? Store leftover bacon fat in a small glass jar in the refrigerator for up to 2 weeks. Keep it submerged in water or broth to prevent oxidation. For longer storage, freeze it in ice cube trays and transfer to a freezer bag. This fat is pure flavor gold—use it to finish sauces, crisp up roasted potatoes, or even enhance pancakes. Just
Can I make this sauce ahead of time?
Yes! Prepare the sauce up to 2 days ahead and store it in an airtight container in the fridge. When reheating, warm it gently over low heat with a splash of heavy cream to restore its silky consistency. For best results, add fresh thyme leaves just before serving to brighten the flavors. The sauce actually tastes better the next day as the flavors meld together.
What can I substitute if I don't have fresh thyme?
Use 1/3 teaspoon dried thyme as a substitute, but remember it lacks the fresh brightness. For a similar herbal note, try 1/4 teaspoon dried rosemary or 1/2 teaspoon fresh parsley. If you're missing thyme entirely, a pinch of lemon zest adds a nice citrusy contrast to the rich sauce. The key is balancing the flavors—don't skip the herb entirely.
How do I prevent the sauce from getting too thick?
If your sauce thickens too much during cooking, whisk in 1 teaspoon of warm water or heavy cream to loosen it. For reheating, add 1 tablespoon of water or broth and warm over low heat while stirring constantly. The ideal consistency should coat the back of a spoon but still drizzle easily. If it's too thin, simmer uncovered for 1-2 minutes to reduce.